Exploring the American Southwest: A 5-Day Van Life Itinerary
Get in, loser! We’re heading to the great american southwest!
… < Insert Mean Girls meme > …
No but seriously, we saved you a seat on our 5-day van trip. You’re in charge of snacks, so it’s not really optional.
You’re coming!
Our base itinerary:
Valley of Fire State Park
Zion National Park
Bryce Canyon
Lake Powell/Page
Sedona (Optional)
A great itinerary on paper, right?
But first things first, we’re gonna need a ride.
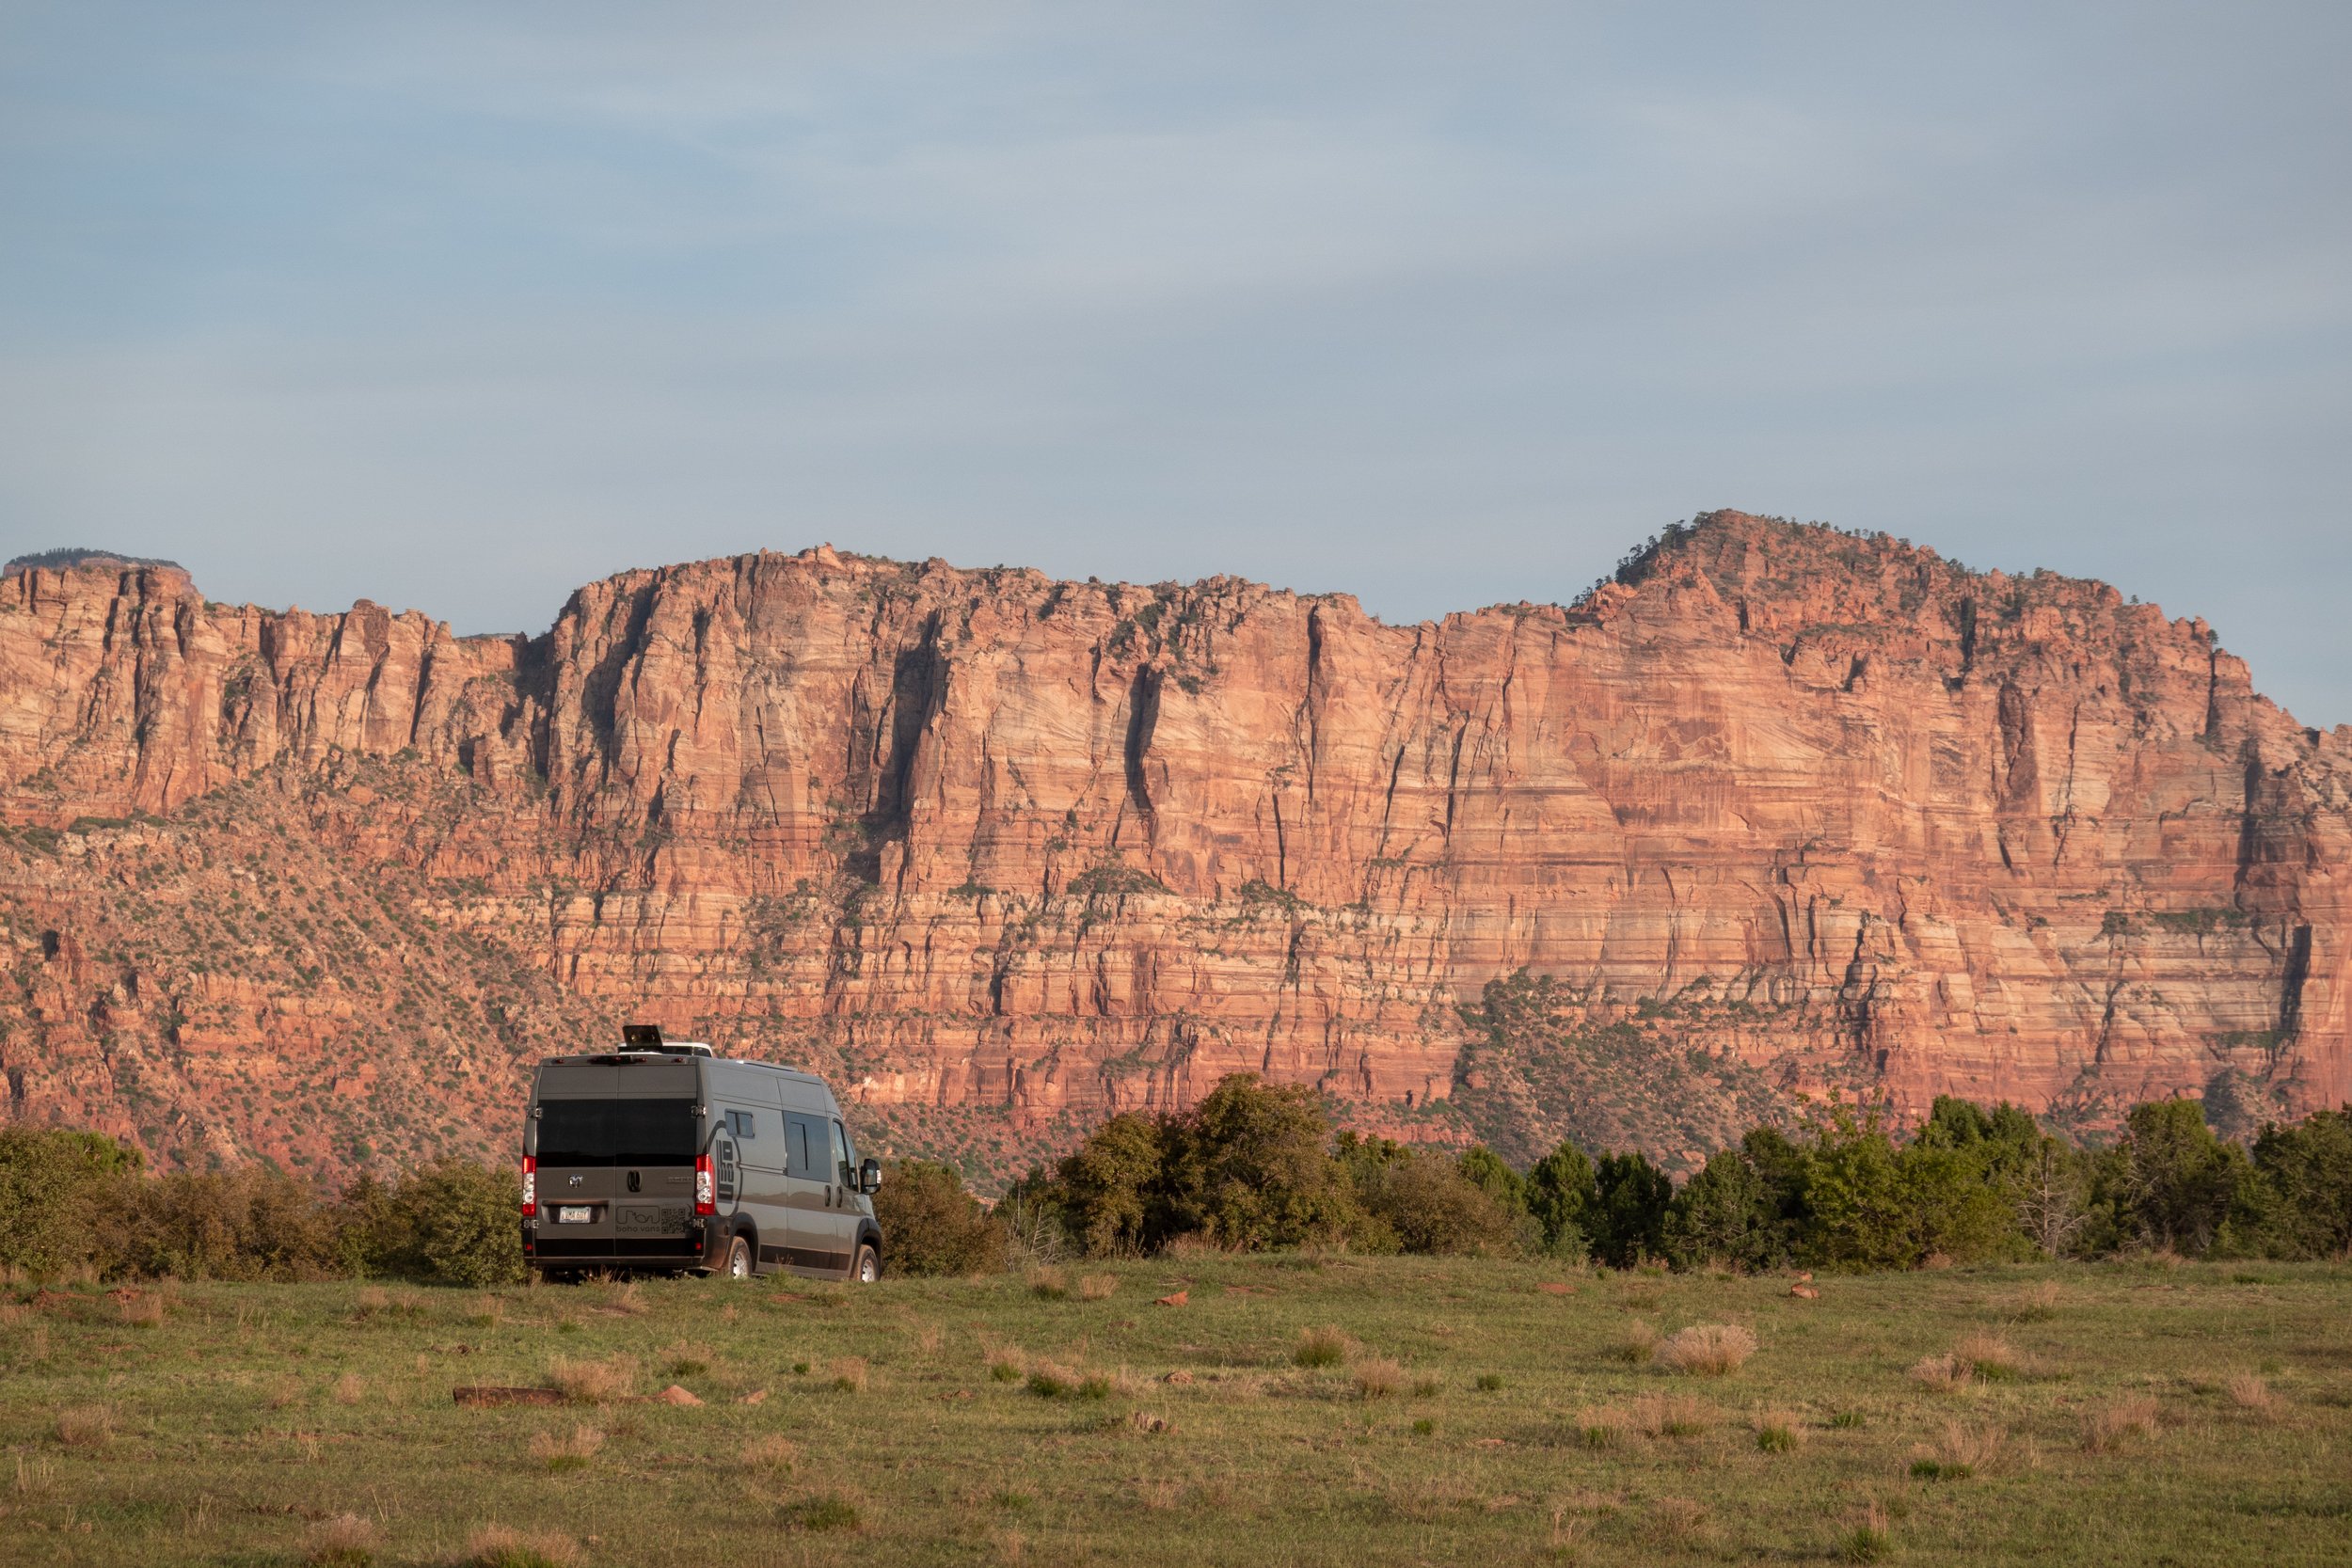
Meet Whitney


Whitney is the newest member of the Boho rental lineup. This van has a beautifully sleek charcoal coat and is packed with all the features you’d expect from a Boho build.
She comes ready for any type of trip you’re planning, thanks to a 400AH lithium battery bank powered by 400W of roof-mounted solar panels. This battery bank is a key feature of the build because it powers Whitney’s off-grid heating and AC, an electric microwave, a heated outdoor shower, and three zones of dimmable LED lighting in the cab.
Since we were taking Whitney out for an early spring trip, we knew that weather could be pretty unpredictable in the parks we were visiting. It was a huge relief to know that we were going to have reliable heating and AC at night.
The Route
Starting the Trip
Today’s Itinerary:
Pickup Whitney in Tempe
Grocery Store
Check out the Hoover Dam
Disperse camp outside of Valley of Fire
We picked Whitney up in Tempe around 1pm, made a quick stop for groceries (and snacks), then started our drive towards our first park: Valley of Fire.
I’m gonna keep day 1 short because we’re doing a lot of driving. We’ve got a lot of ground to cover.
You already know what this means - lots of Red Bull and Chris Stapleton!
But we do have one quick stop to make on the way:
The Hoover Dam
By the time we made it to the Hoover Dam, it was already dark out. I honestly wasn’t expecting to get much from this stop, but it was too close off the highway to not check out.
It ended up being cooler than I thought and we had the bridge mostly to ourselves since we got there so late.


We’ve got places to be, so we’re not going to be spending a ton of time here, but it’s absolutely worth the stop on the way.
We decided to try out a dispersed campsite near Lake Mead—off Stewarts Point Road. We didn’t really have a good gauge on what to expect once we got here, but it was free, and we were tired. We turn off on Stewart’s Pass Road, and follow a long gravel drive back to some private lots.
We set up camp for the night and get ready to hit the ground running first thing in the morning.
Day 2
Todays Itinerary:
Sunrise at Stewarts Point
Check out Valley of Fire State Park
Drive to campsite outside of Zion National Park (Zion Wright Family Ranch)
Unwind and hangout at our campsite
Our alarm is set for 5:30 this morning. I’m not a morning person by any stretch of the imagination but I make a point to never skip a sunrise on vacation.
Keep in mind, we got to our camp site late into the night with low expectations and no idea what view we’d be waking up to.
So you can imagine the shock when we pulled down the window covers and hopped out of the van to this view:
We knew there was a lake near this campsite but had no idea how close we were to it. It was so dark driving in the night before that we could only see as far as the headlights could reach. We got very lucky to stumble onto this serene lake and mountain backdrop to start day 2.
It’s definitely one of the best “free” camping sites we’ve stayed at and one we recommend if you’re visiting Valley of Fire State Park!
We practically had the place to ourselves that morning, with only 2-3 other campers staying there. So we spent a little bit of time getting shots of the van, and enjoying a slow start to the morning.
After a quick breakfast, we started back down the gravel road of Stewart’s Point.
Note if you’re planning on camping here.
We did hit a pretty major roadblock on our way out!
As we were making our way back out, we had a run in with a few resident Jack-asses that think they own the place.
I’m not usually one to share incidents like this.
but I want anyone reading this to be warned in case you come across these same guys.
Can you believe the audacity!
All jokes aside, this was easily one of the most memorable and unexpected parts of our whole trip!
Spoiler alert: This won’t be our only roadblock today!
After making our way past the Stewart’s Point bouncers, we finally make it to Valley of Fire State Park.

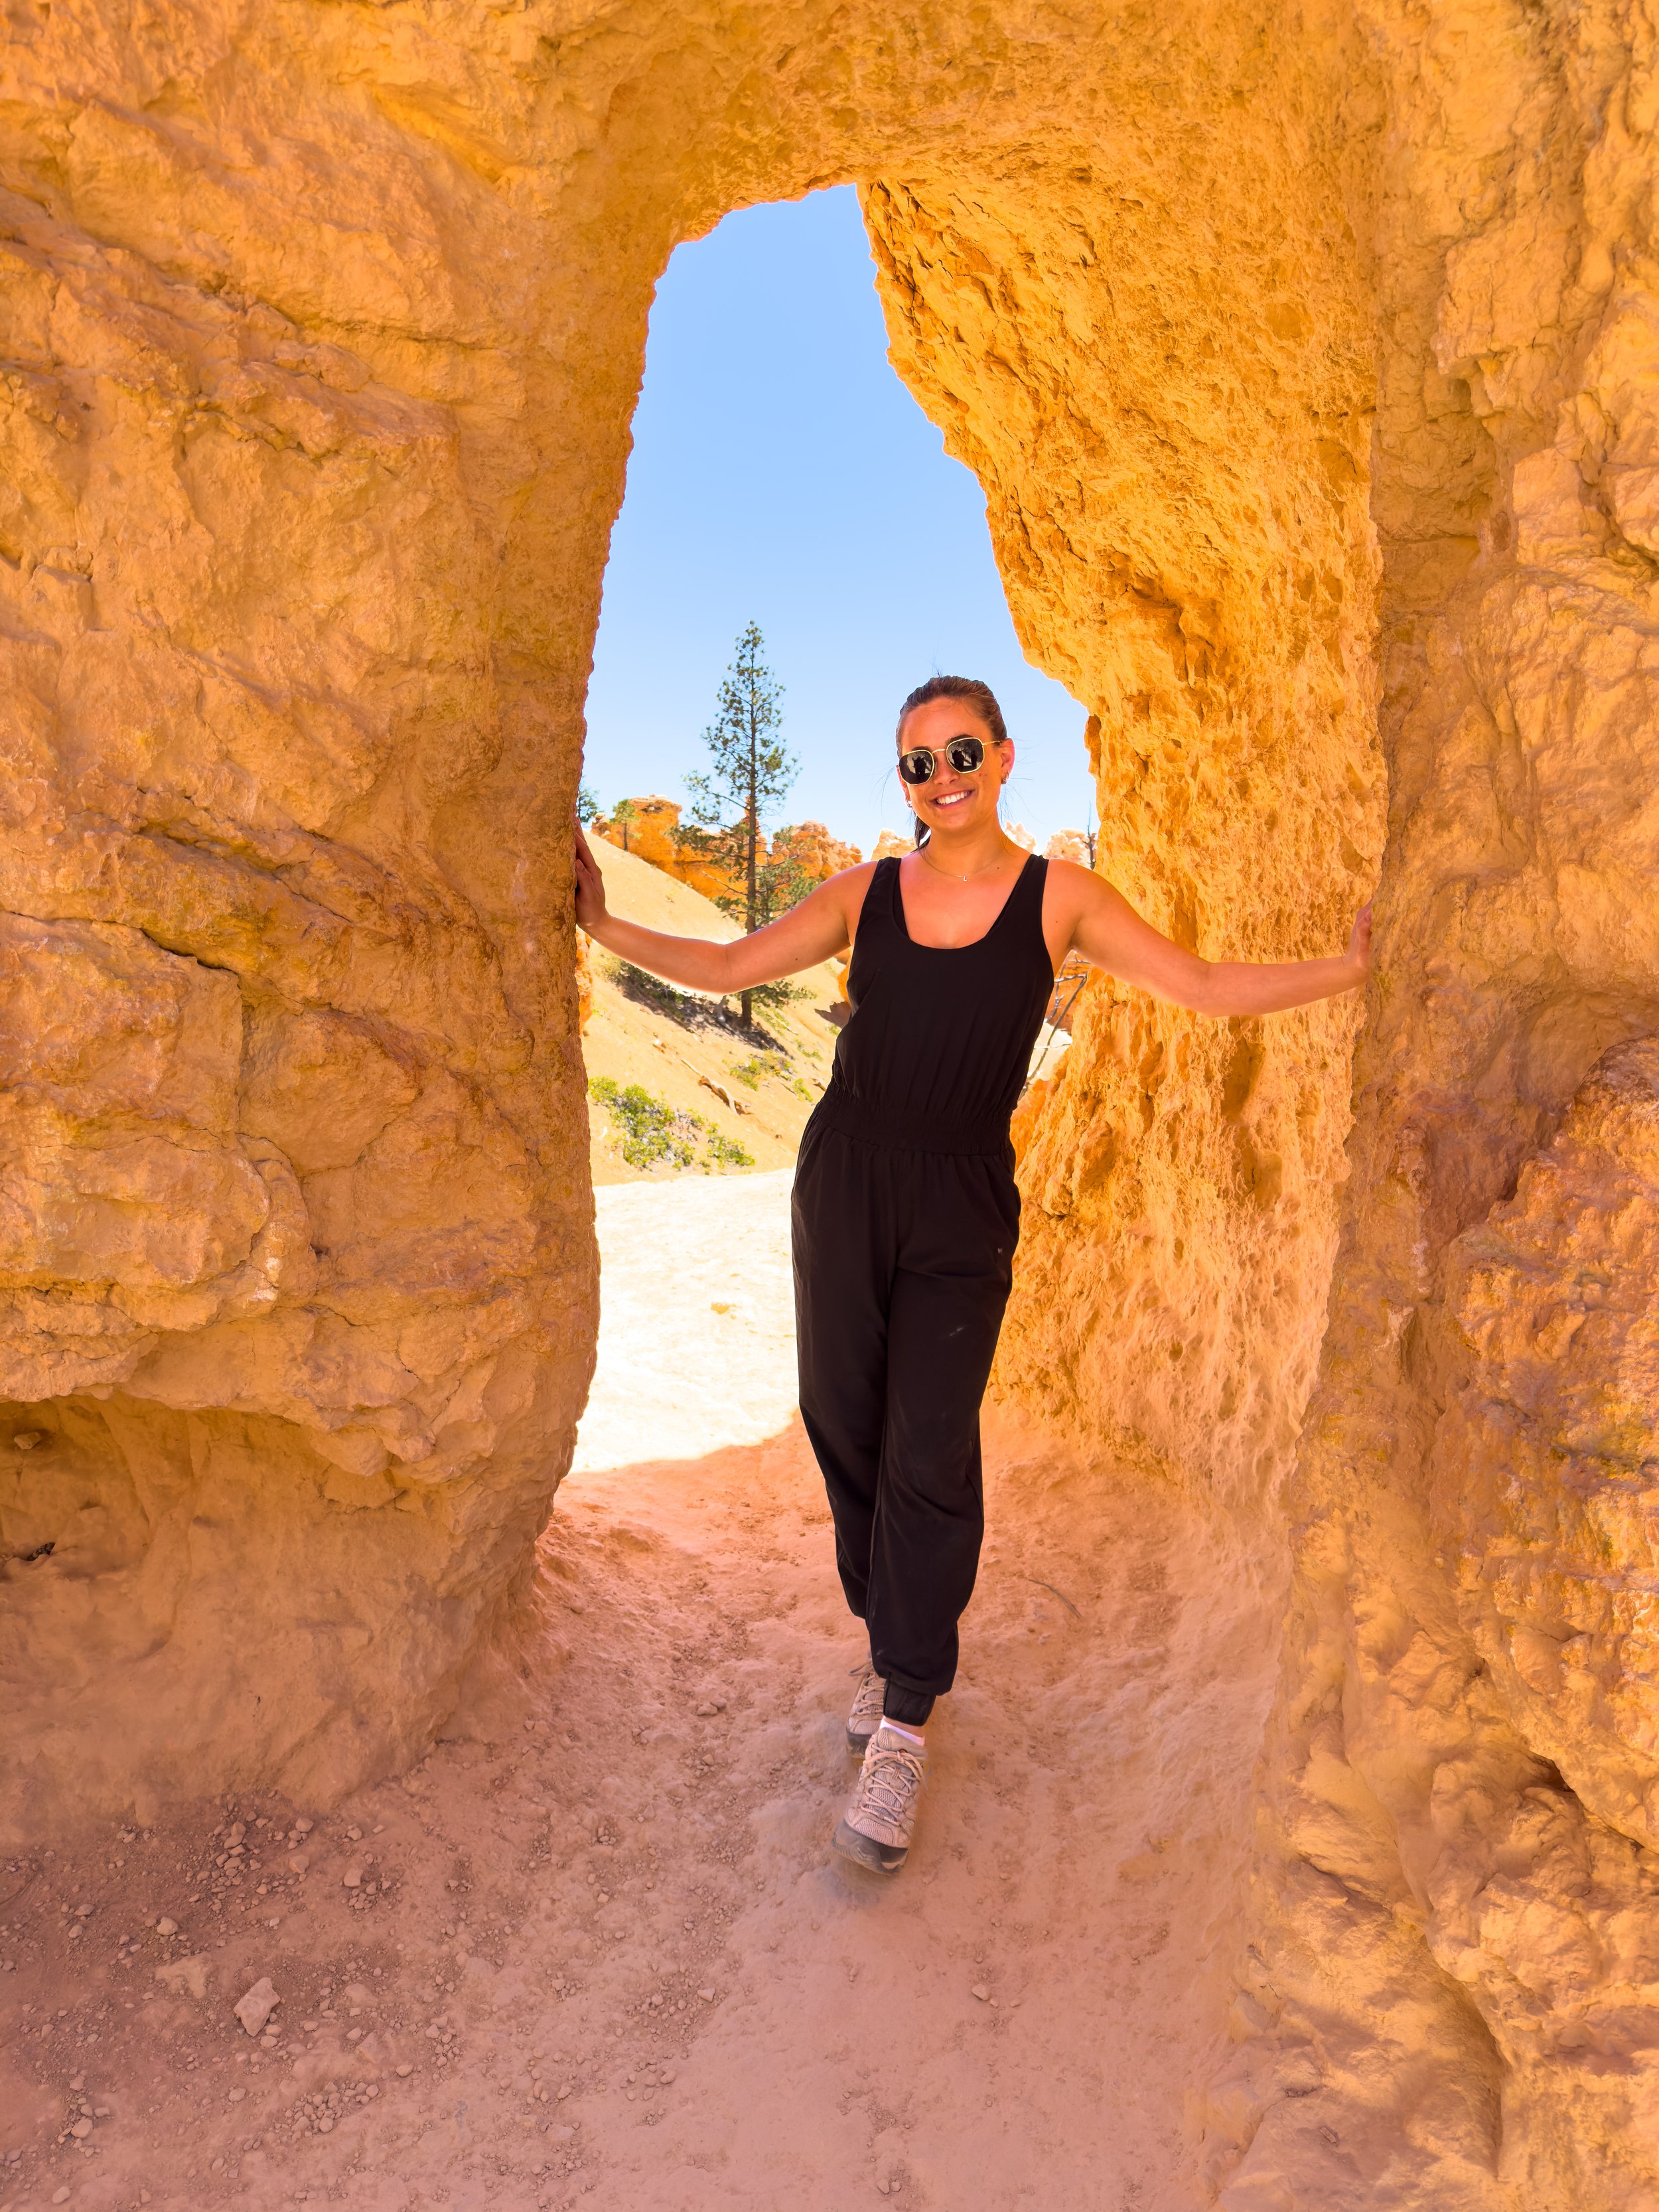
Valley of Fire is famous for its fiery sandstone rock formations and is especially popular for sunset and sunrise photography. It is a very unique and dramatic landscape with several great hiking trails such as The Fire Wave, Elephant Rock, White Dome, and Mouse’s Tank.
We didn’t do any hiking here today because we knew we had several planned in Zion National Park and Bryce Canyon later in the trip. But it’s certainly worth driving through.
Cue our second roadblock of the day:
A pack of Bighorn Sheep
We were stoked about this one because we were hoping to see sheep when we were planning our stop here.
We actually asked the gate attendant when entering the park where the best place to see sheep might be. She mentioned that the earlier morning hours, before high noon, was going to be our best bet to catch them feeding.
I guess we were right on time.
This was a very welcomed road block.
We spent an hour or so driving through the park, taking in some of the overlook views before continuing our way towards Zion National Park.
Next Stop: Zion Wright Ranch
We tend to prefer a more impromptu style of travel, so most of the time we just pick a direction to drive and Lauren handles the rest.
We’re booking all of this on the fly, with no prior research aside from what Lauren is able to piece together between service towers during the drive.
She was able to find a campsite just outside of Zion that looked to have some really cool scenery.
We take a chance and book an overnight at Zion Family Ranch Campgrounds for a total cost of $47.
St. George is one of the last big towns we’ll pass through on our way there so we decide to grab dinner at a barbeque joint called Pica Rica BBQ.

The place had a really nice southwestern vibe to it, and the food was great. Fair warning though, it was pricey!
We spent a total of $75 here for the 2 of us to eat.
After a quick dinner here, we continue on to our campsite.
The drive into Zion Wright Ranch is beautiful!
The more we drive, the more scenic this area gets. We follow a long, windy, dirt road up to the campgrounds.
We pull in and claim one of camp sites, putting atleast a full football field between us and the next closest travelers.
Right off the bat, this place is incredible.
It’s hard to believe we’ll be camping here tonight.
And best of all, the airspace is drone-friendly.
Aside from the obviously striking scenery, there’s so much to do here to stay entertained.
While our campsite is very private and quiet, we can still see other families in the distance. Some are mountain biking, others are horseback-riding, and a few are taking in the views from different parts of the meadow.
And I haven’t even mentioned the coolest part.
There are cows roaming free everywhere you look!
I’ve genuinely never camped somewhere so secluded but still so vibrant and active.
We spend most of the night hanging out next to the fire and watching episodes of our favorite shows that we downloaded prior to the trip.
The only sounds around us are cow bells ringing in the dark.
I’d probably live here if I could.
10/10 campsite, 10/10 Day.
Day 3
Todays Itinerary:
Take in sunrise at Zion Wright Campsite
Visit Zion Park + Hike Angel’s Landing
Find a campsite near Bryce Canyon
We slept in a little bit this next morning, but still got an early rise. We wanted to get a decent start on the day so that we would have time to hike Angel’s Landing in Zion!
We start our day just as the sun is peeking over the ridge line.
Looking back, we could have spent a whole 3-4 night trip here and never gotten tired of it. I think we might have to do exactly that on a future trip!
We load up the van, and we’re off to Zion National Park for the day. The entry fee was $35.
Everybody always says to get to Zion early if you want to have a chance at finding parking inside. We didn’t listen, AND THEY WERE RIGHT!
Especially considering we’re in a 20-foot van, it was difficult to find a spot. We did finally luck out after about 3-4 trips around the parking lot.
The shuttle lines weren’t too bad.
To get to Angel’s Landing, we needed to take the shuttle to Stop 6.
Angel’s Landing
Hike Details (Walter’s Wiggles x Scout Lookout x Angel’s Landing)
Distance: 5.4 miles round trip
Elevation Gain: ~1,500 feet
Difficulty: Strenuous
Time: 4–6 hours
Permit Required
If you’ve ever been on social media, you’ve probably seen videos and/or pictures of Angel’s Landing. It’s one of the most popular hikes and natural landmarks in the entire world—and rightfully so. It’s also one of the more dangerous.
As of 2022, you need to have a permit to hike it. I’ll link information on how to obtain a permit here.
MAKE NOTE: You need to remember to apply for the daily lottery, the day BEFORE you plan on hiking, by 3PM.
You only need a permit to hike the last portion of the trail. If you apply for a permit and do not get selected, you are still able to hike up to Scout’s Lookout to watch other hikers take on the challenge of Angel’s Landing.
It’s an amazing view regardless.
The last half-mile of the hike features a spine-like ridge with sheer 1,000+ foot drop-offs on each side of it. Chains are bolted into the rock for support, adding a mix of adrenaline and exposure to the hike.

Angel’s Landing - Permit-Required to hike this last stretch
At the summit, hikers get to take in a 360-degree, panoramic view of Zion Canyon. It’s not a hike for the faint of heart, especially if you have a fear of heights.
Sounds like a hard hike, right?
Well, it is. But that might not even be the hardest part of the hike.
In my opinion, there has to be some respect paid to those that are able to conquer Walter’s Wiggles, on their way up to Scout’s Lookout and Angel’s Landing.

That’s exactly what we did. Since Lauren and I missed the permit application window to hike the full length of Angel’s Landing, we decided to still hike up to Scout’s Lookout to get a view of the famous ridgeline.
Come prepared with plenty of water, and good hiking shoes because Walter’s Wiggles is exhausting!
It’s a series of 21 tightly-packed switchbacks that lead up to Scout’s Lookout and Angel’s Landing.
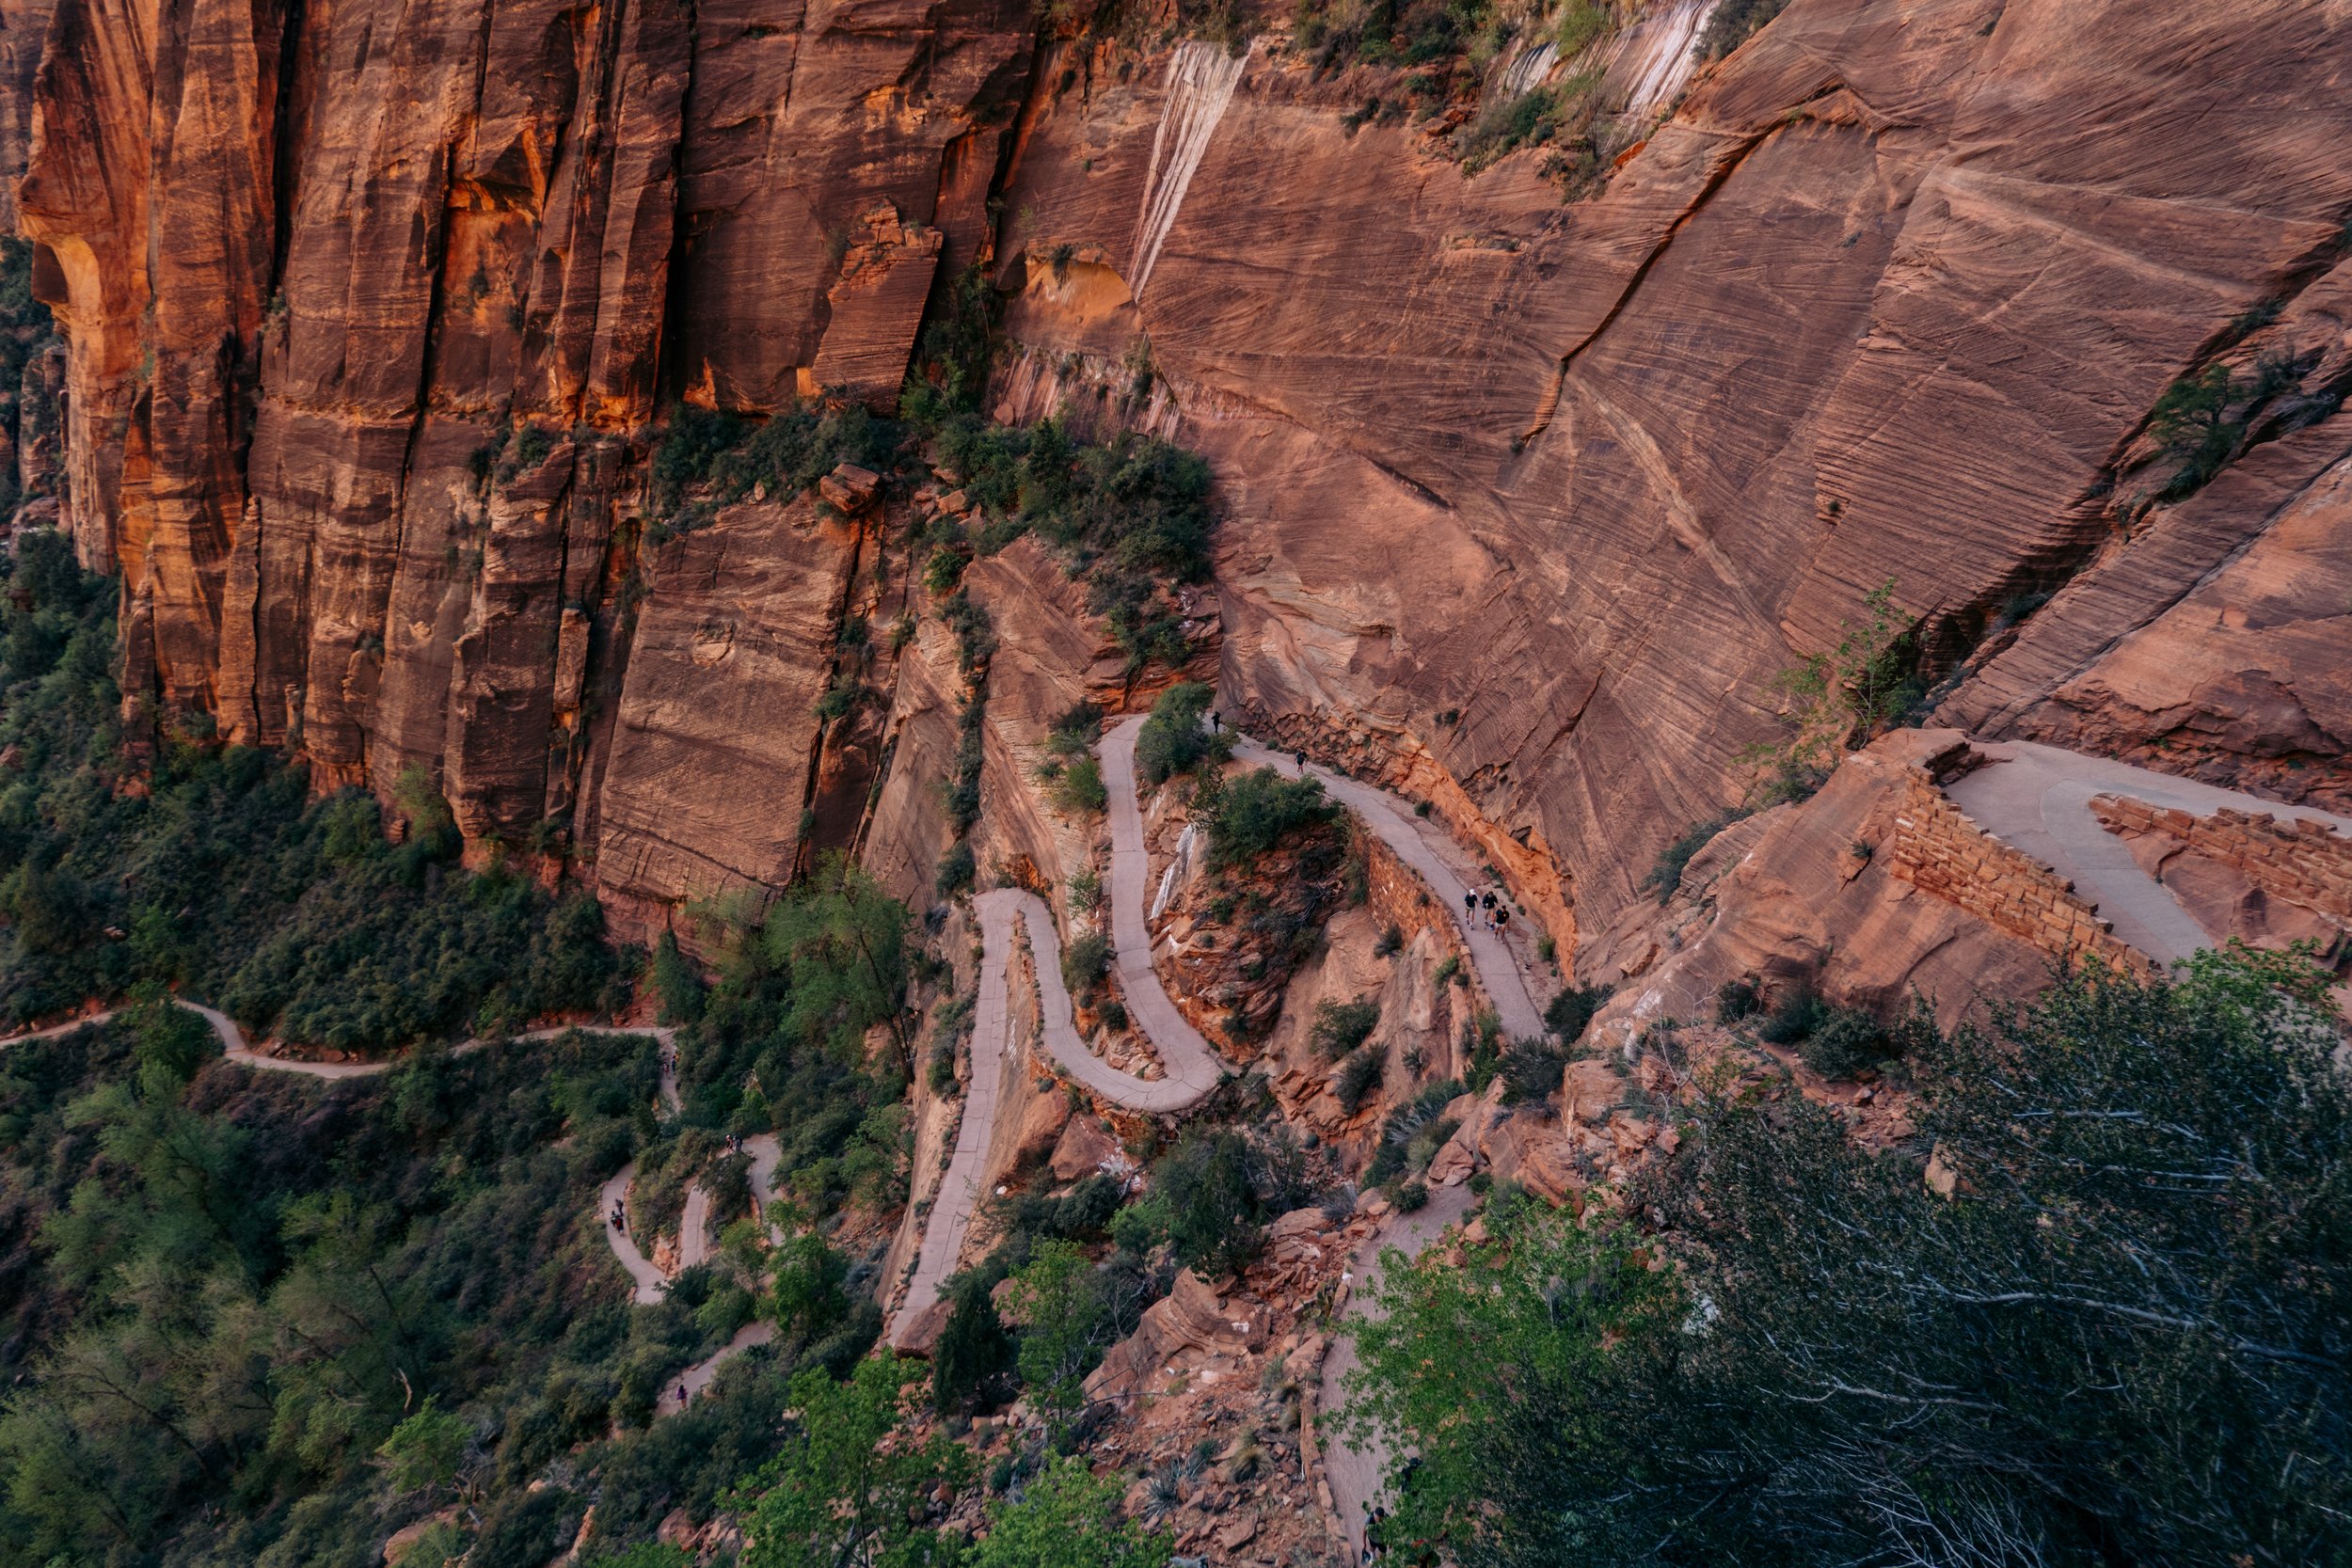
Walter’s Wiggles - A series of 21 tightly-packed switchbacks.
It is easily one of the most challenging parts of the hike but isn’t inherently dangerous like the Angel’s Landing portion is.
We definitely earned our rest by the time we made it to the top.
As much as we enjoyed the hike and the incredible views from Scout’s Lookout, we couldn’t help but kick ourselves at the top for missing the chance to submit for the Angels Landing permit in time.
If you plan on hiking up to Scout’s Lookout, I recommend applying for the permit; even if you aren’t sure yet that you’ll want to hike the last part. Atleast then you’ll give yourself option to decide once you get to the top.
We finished up the hike in just under 2 hours, then caught a shuttle back to the van.

Alternative Option for non-hikers:
Rent an e-bike and ride through Zion Canyon.
After a quick lunch in the van, we’re back on the road with Whitney.
We’re heading to Bryce Canyon next, and fortunately, the route takes us directly through the rest of Zion Park. There are so many scenic overlooks on the way. Definitely worth taking the time to stop off at some.
Again - we found a campsite on the fly. Since we’d be getting into Bryce so late, we didn’t spend much time planning where to stay.
We found some dispersed camping right outside of the entrance of the pack, and called it a night.
Day 4
We get a jump on the day around 6:30 with the intention of catching sunrise inside Bryce Canyon. If you’re going to be visiting Bryce, please do not skip sunrise or sunset while you’re here!
Of all the places I’ve spent time photographing in my life, Bryce Canyon at sunrise competes for the very top. It is always, always, always worth the early rise tradeoff.

The hoodoos of Bryce Canyon are unique this specific region and you won’t find anything like it anywhere else.
Pro tip:
If you’re visiting for sunrise, Skip Sunrise Point and go straight to Inspiration Point.
You will not regret it!
The names may suggest differently, but you’ll get less crowd because everybody just assumes Sunrise Point is the place to be.
I’ve experienced both, and Inspiration Point is by far my favorite spot in the park because you get a full panorama of the Bryce Amphitheatre with a little more space to enjoy it at your own pace.
But don’t take my word at face value here.
I can show you better than I can tell you.
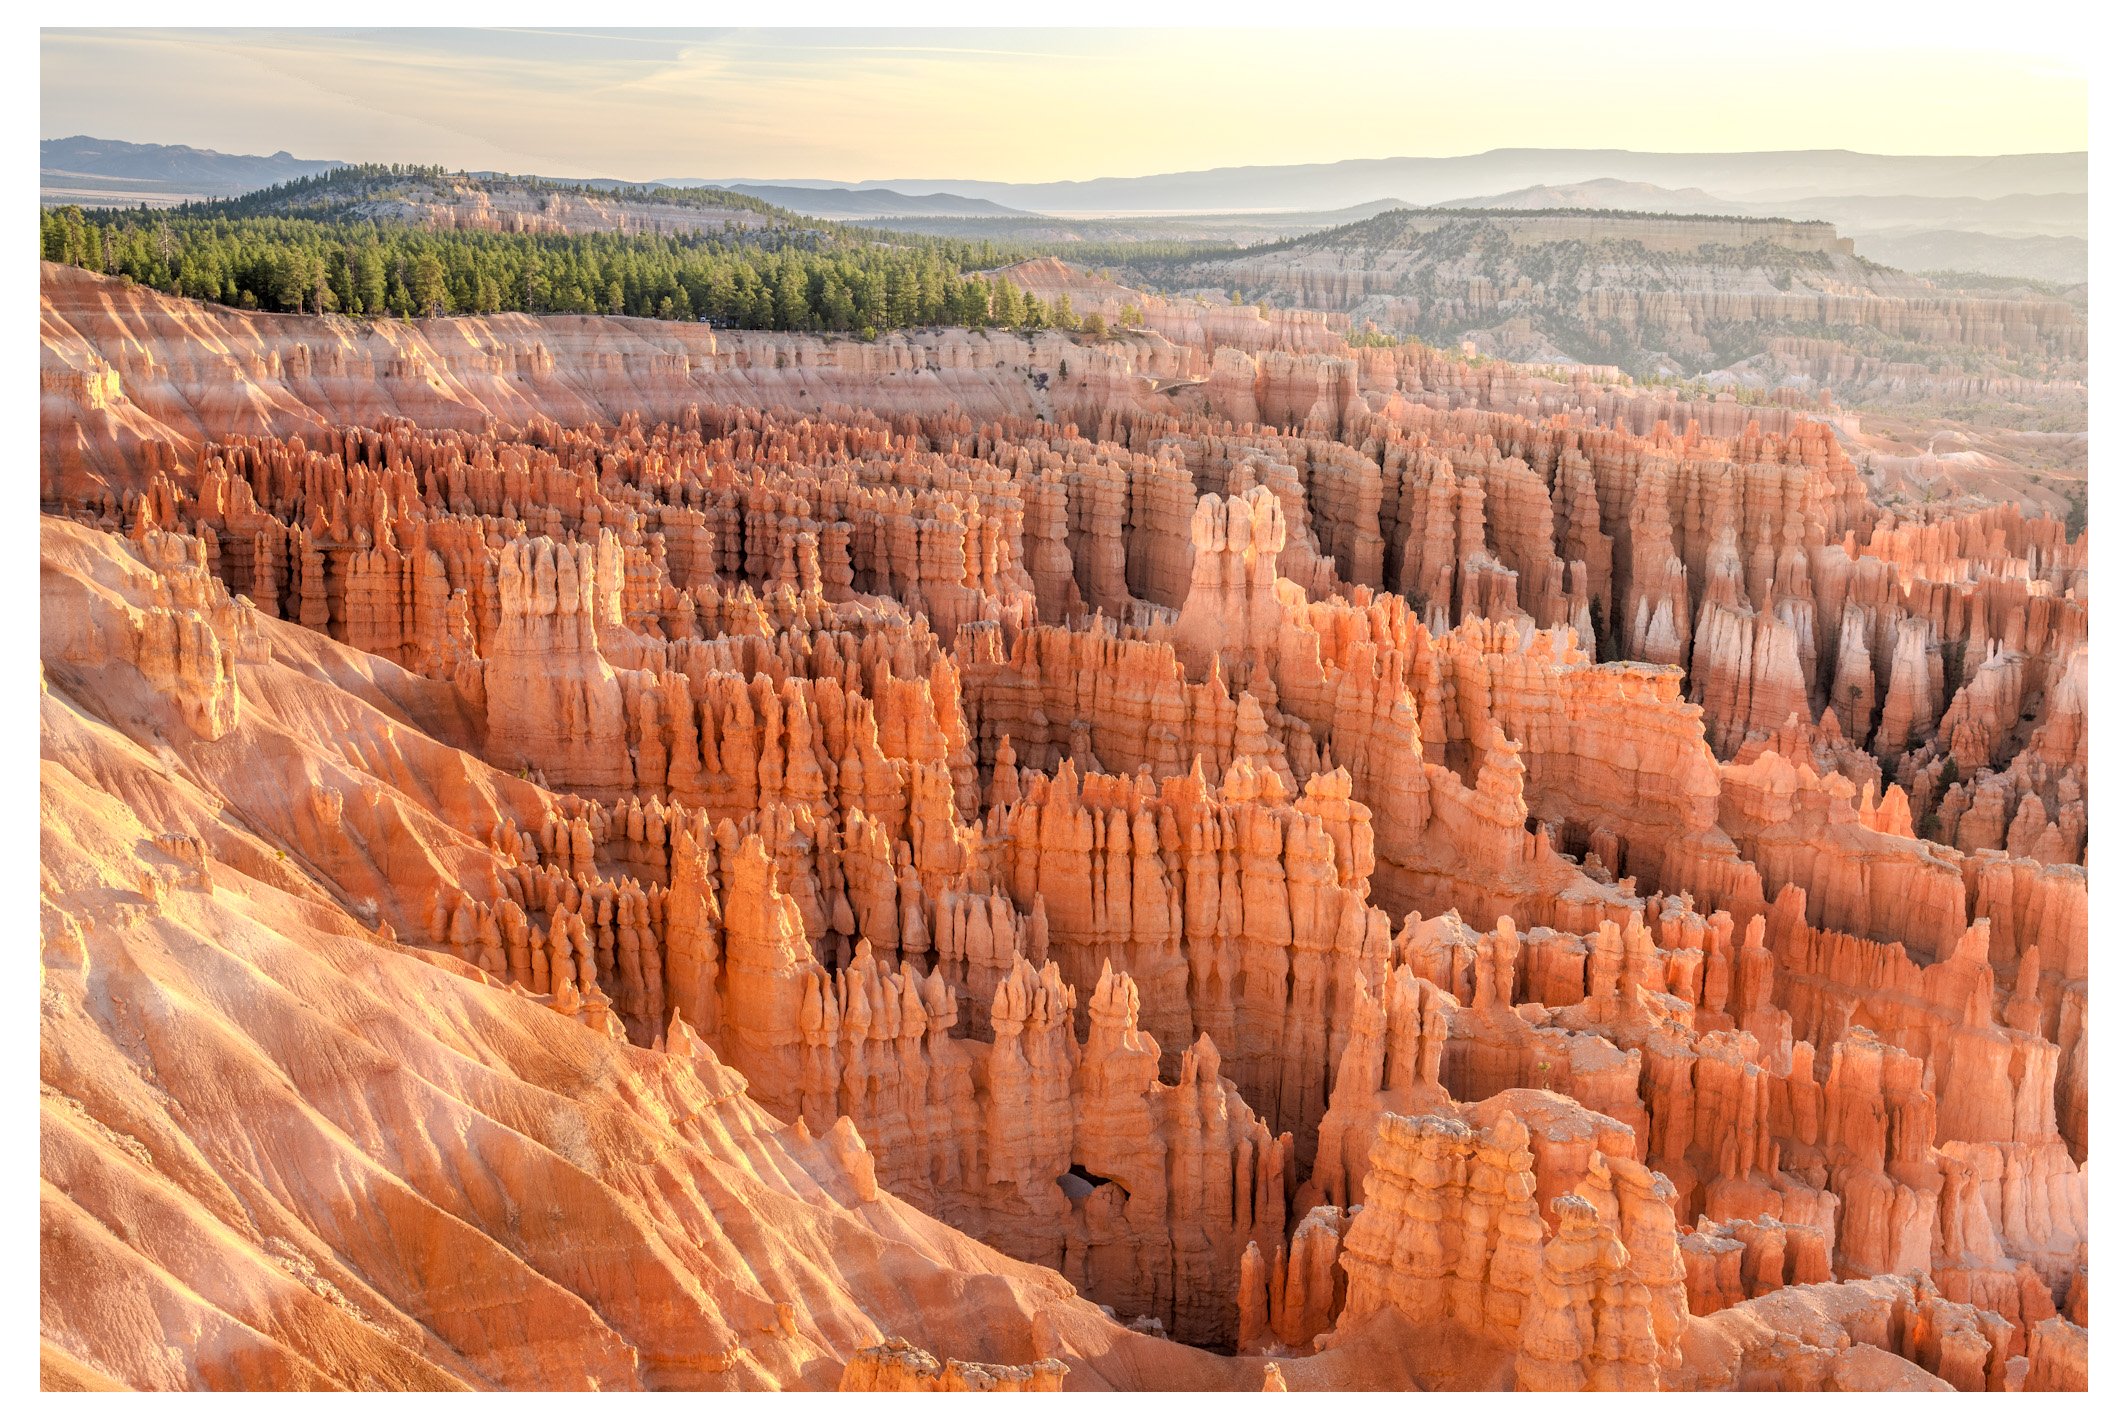
Bryce Canyon: Inspiration Point at Sunrise
Bryce Canyon: Inspiration Point at Sunrise
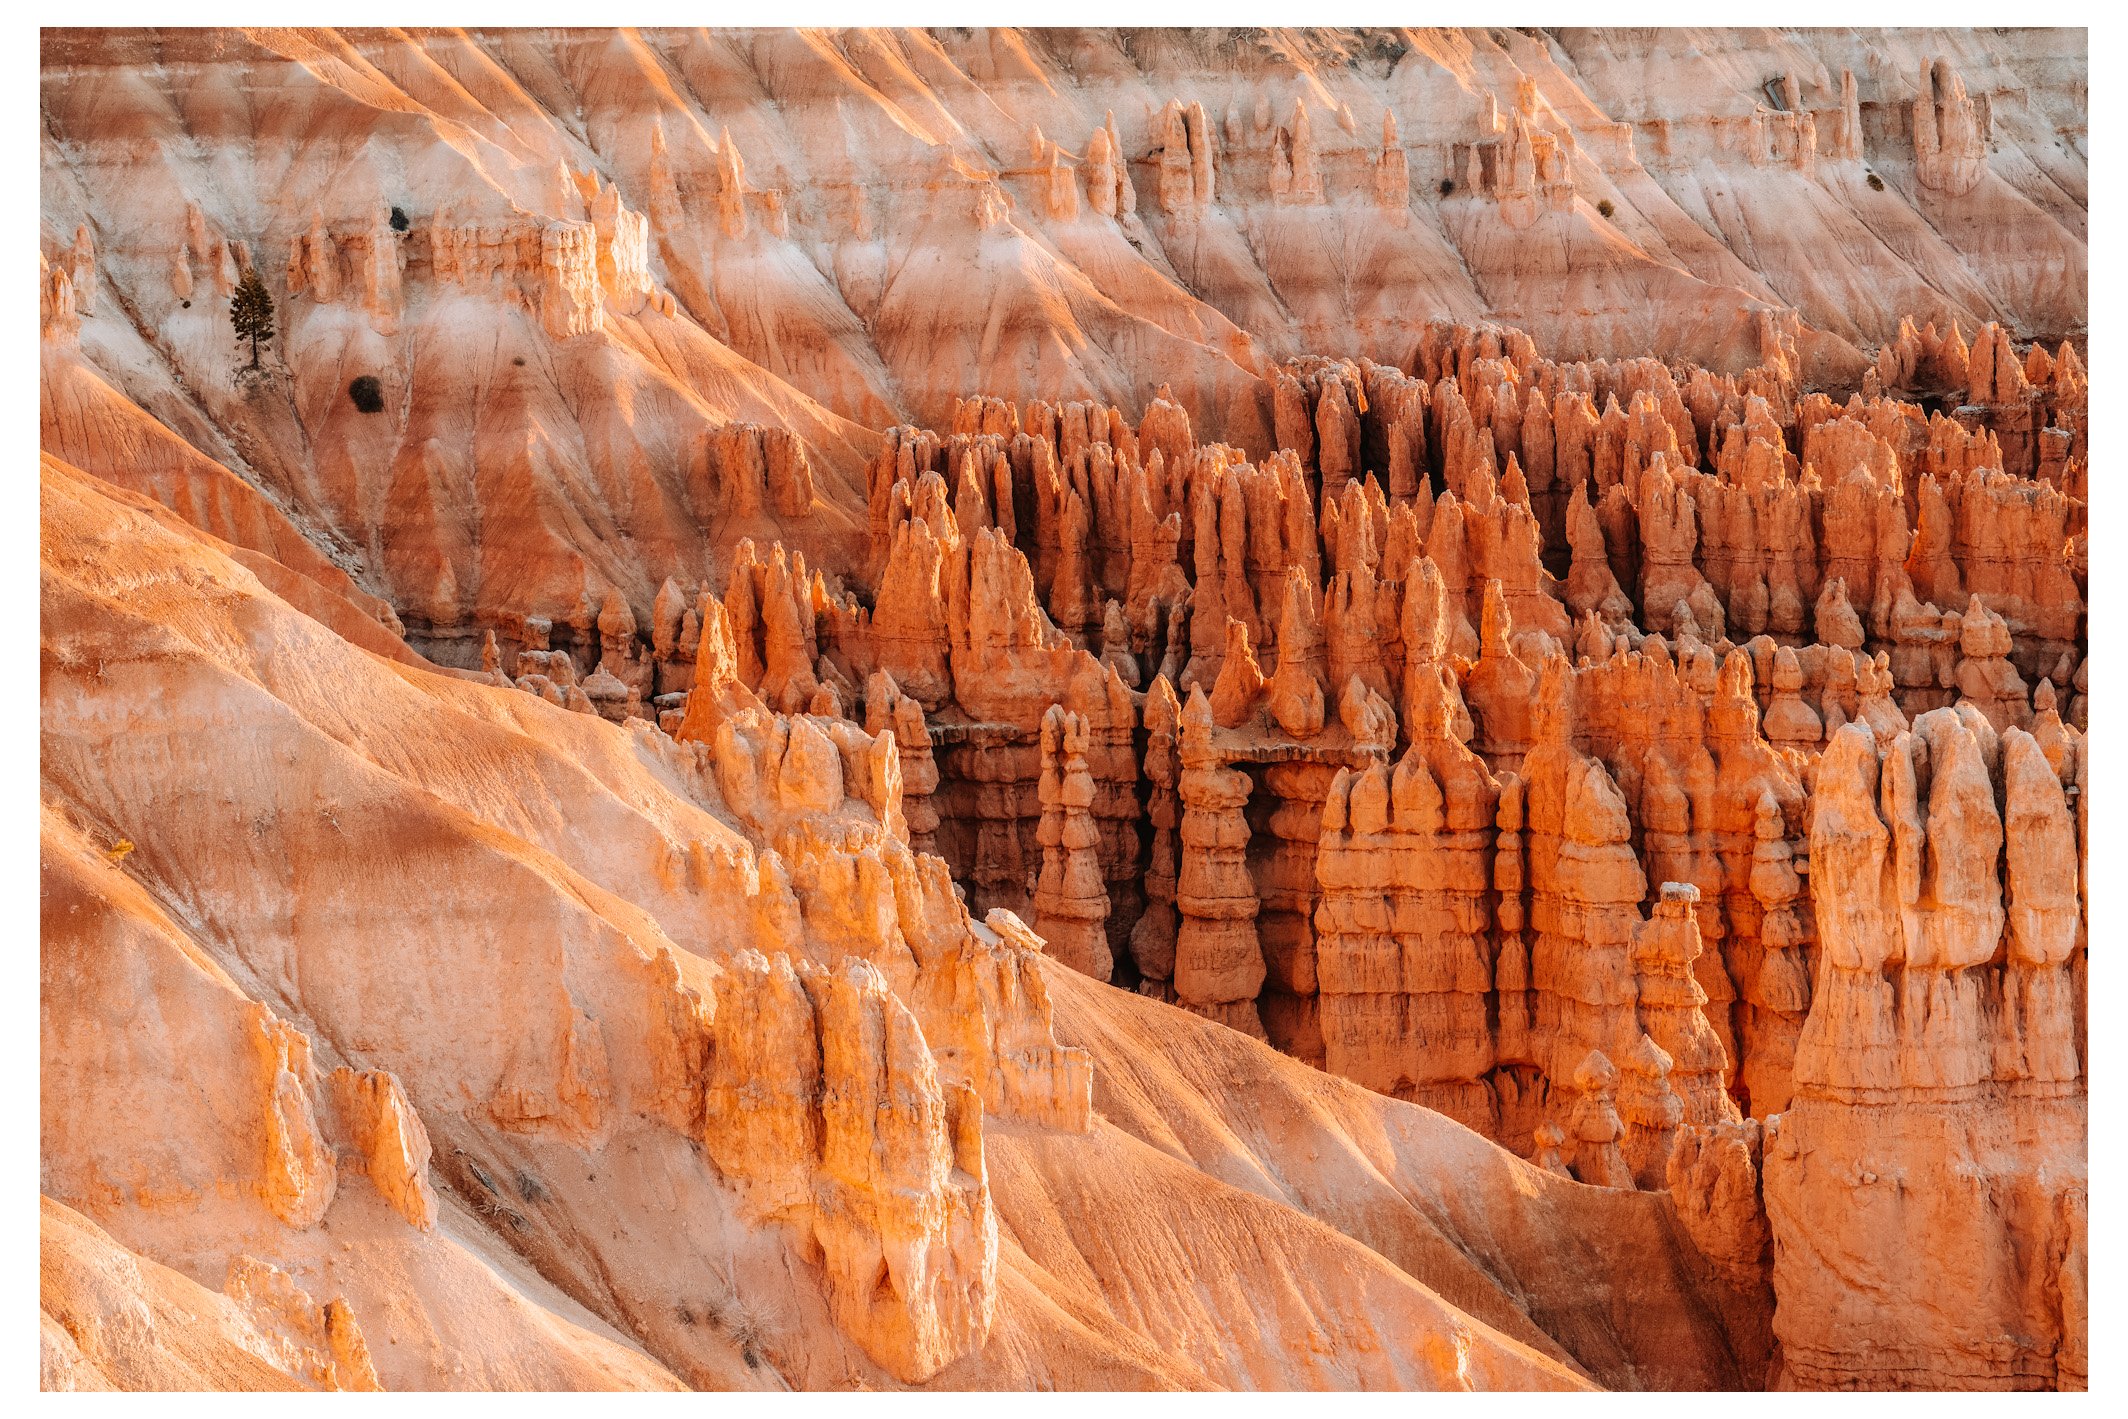
Lauren and I spent a good hour or so taking photos, watching the sunlight weave in and out of the tight crevices of this martian landscape.
After a quick breakfast, we’ll be be doing weave in and out of them ourselves on our hike.
Hiking Bryce Canyon
Today’s Hike: Navajo Trail Loop-Queens Garden Trail
Distance: ~3 miles round trip (loop)
Difficulty: Moderate
Elevation Change: ~600 feet
Estimated Time: 1.5 to 2.5 hours
Starting Point: Sunset Point
Ending Point: Sunrise Point (loop returns along the Rim Trail)
The best time of day to hike this trail is going to be during (or just after) sunrise, or late afternoon. This is when you’ll get the best glow of color bouncing off the Hoodoos. Plus, Bryce Canyon is still a desert terrain, which can get very hot during the peak of day.
This loop is awesome because it provides hikers an intimate experience of descending into the amphitheater, while getting a close up view of the Hoodoos. This trail carves through a a variety of slot canyons, towering hoodoos, natural bridges, and panoramic views of the valley.
I like to start this loop at Sunset Point because I prefer to walk down this set of picturesque switchbacks, referred to as “Wall Street”, rather than up.

Bryce Canyon: Wall Street
At the base of these switchbacks, the trail starts to even out and wind through a maze of hoodoos with many spots to rest under shaded trees.
Definitely take advantage of this if you’re hiking mid-day, even if it's just for a quick water break, because you won’t get much shade elsewhere on the this loop trail.

This is a peaceful, low intensity stretch of trail that weaves through the lower portion of canyon and eventually connects to Queen’s Garden.
Queen’s Garden follows a gradual ascent through the Amphitheater back towards the upper rim. It’s definietly one of the most scenic and photogenic parts of this hike.
One of our favorite parts of this hike were the natural bridges and archways you get a chance to hike through.
Once you make it back up to the rim, it is an easy hike across the rim of the canyon back to Sunset Point, where we started the hike.
A More Challenging Alternative: Fairyland Loop
For the avid hiker, check out Fairyland Loop Trail. We didn’t think we had the energy for this one today, so I can’t speak from first-hand experience. However, this hike was highly recommended to us as a longer alternative to the Navajo Loop.
Here is a quick side-by-side comparison of the 2 to help decide which one might be best for your trip:
| Feature | Fairyland Loop | Navajo Loop–Queens Garden |
|---|---|---|
| Distance | ~8 miles | ~2.9 miles |
| Elevation Change | ~1,700 feet | ~600 feet |
| Difficulty | Moderate to Strenuous | Moderate |
| Time Required | 4–5 hours | 1.5–2.5 hours |
| Crowds | Low – Quiet & Peaceful | High – Very Popular |
| Trail Type | Loop with Rim Trail return | Loop |
| Scenery | Towering hoodoos, Boat Mesa, Tower Bridge, panoramic views | Thor’s Hammer, Wall Street, Queen Victoria, tight switchbacks |
| Best For | Adventurous hikers wanting solitude and variety | First-time visitors wanting classic Bryce views in a shorter hike |
| Starting Point | Fairyland Point or Sunrise Point | Sunset Point (down), Sunrise Point (up) |
| Photographic Highlights | Tower Bridge, sweeping hoodoo valleys, early morning light | Wall Street switchbacks, Thor’s Hammer, golden hour glow |
| Trail Conditions | More remote, less maintained, some steeper sections | Well-maintained, easier to follow |
| Unique Feature | Feels like a full backcountry experience in the heart of the amphitheater | Compact and dramatic descent among famous formations |
We didn’t end up hiking this one ourselves, so I don’t have pictures to share of this. But if we ever make it back, its first on our list!
After the hike, we ate lunch back at the van, then took our time visiting some of the other overlooks in the park.
I probably won’t live long enough to ever visit Mars.
Having been to Bryce Canyon, I can say I got close.
Next Stop: Kanab Sand Caves
After leaving Bryce Canyon, we continue on our route towards Page, Arizona.
Lauren does her usual detective work from the passenger seat of Whitney to try to find us a campsite on the way. She finds us a spot near Glen Canyon Recreation Area that looks perfect.
In our typical impromptu fashion though, we end up getting side-tracked along the way and pulled off for another hike.
I guess we did have enough energy for Fairyland Loop.
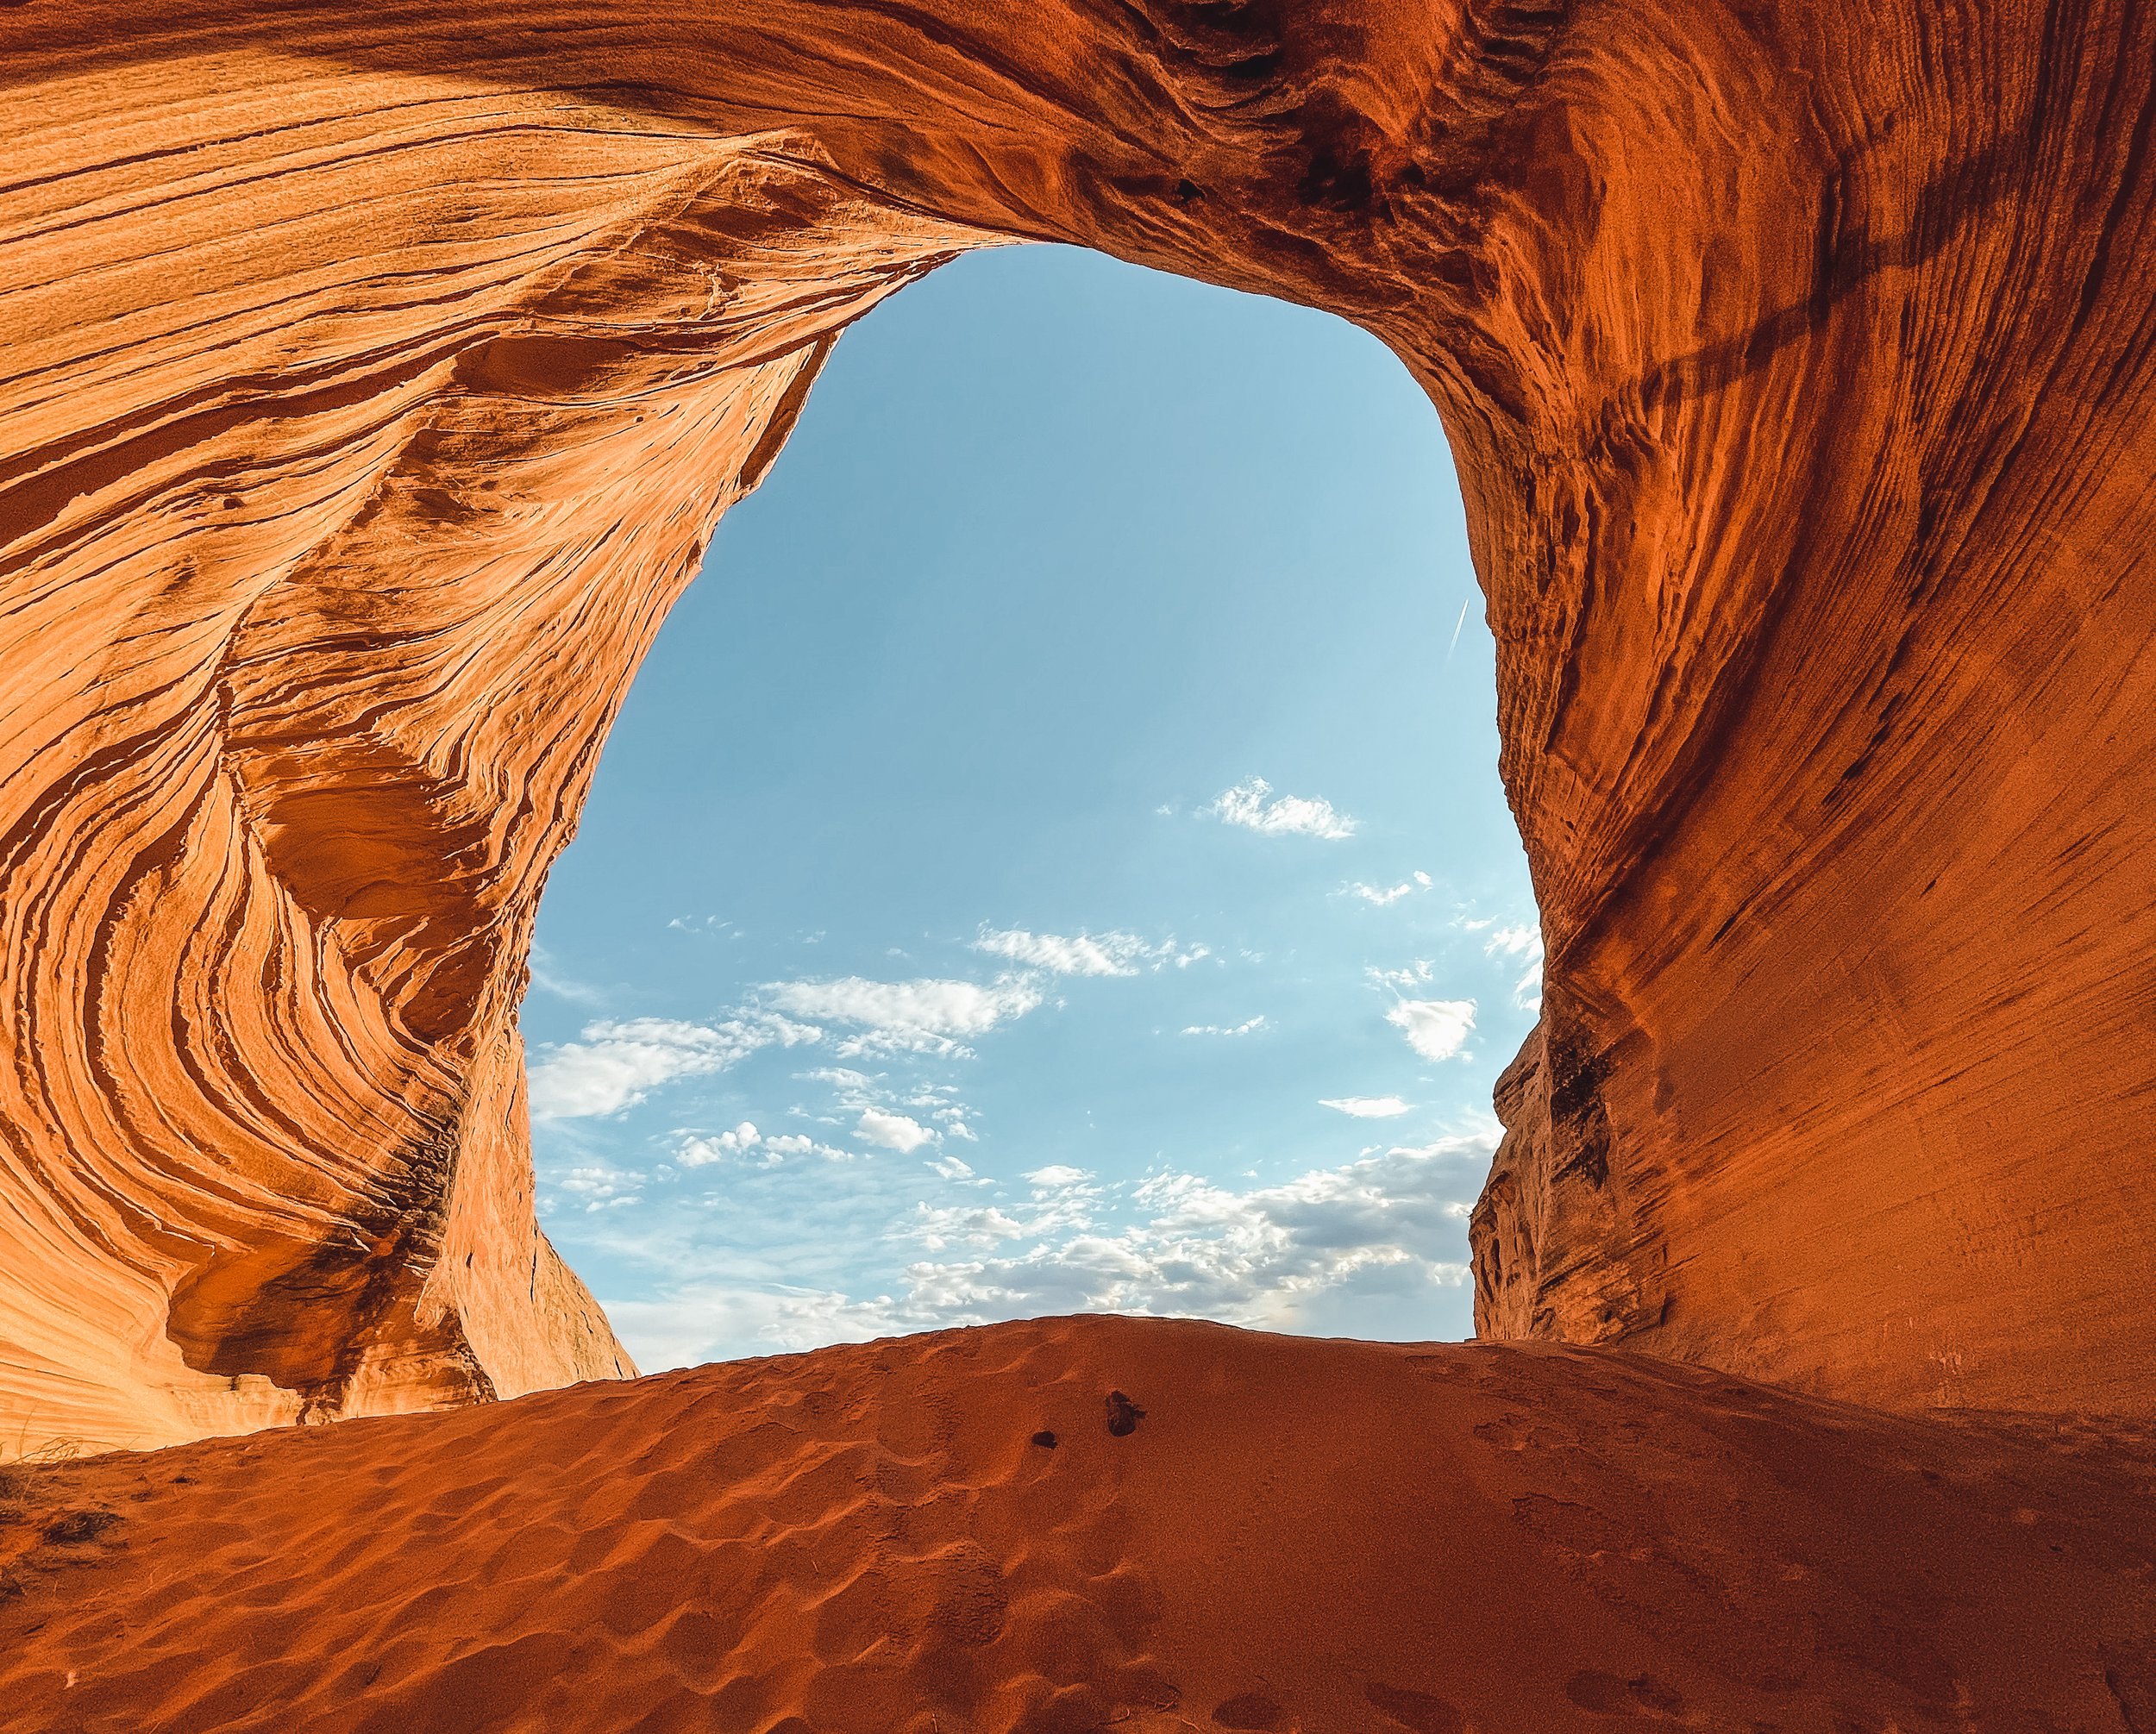
As we were passing through Kanab en-route to Page, we stumbled directly onto a famous Sand Cave Trail right off side of the highway. I’ll link more info about the Kanab Sand Caves here.
I was actually pretty excited to run across these. I’d heard of them before and knew it to be a relatively easy hike, but had no idea we’d be passing by this close to them.
We’re arriving at the perfect time too, as the late-evening sun starts to set in Kanab.
This is the perfect hike to cap off an already great day and stretch your legs after a bit of driving. It is only a half mile round-trip starting from the parking lot. It’s actually a lot of fun too, due to the terrain you navigate across, and a few unique features.
To get up to the Sand Caves, there is a rope climb that, while not inherently challenging, can seem a little daunting if you’re not the most coordinated or athletic.
We did pass several families of all backgrounds that seemed to navigate it pretty easily, even with young kids. Know your limits though, of course. Once you pass this part, its a short traverse over to the caves.
We both came into this one just looking for an excuse to stretch our legs after driving but it genuinely exceeded expectations.
These caves are badass.
The textures of rock and archway overlooks that are carved into the side of the mountain make for some awesome compositions also.


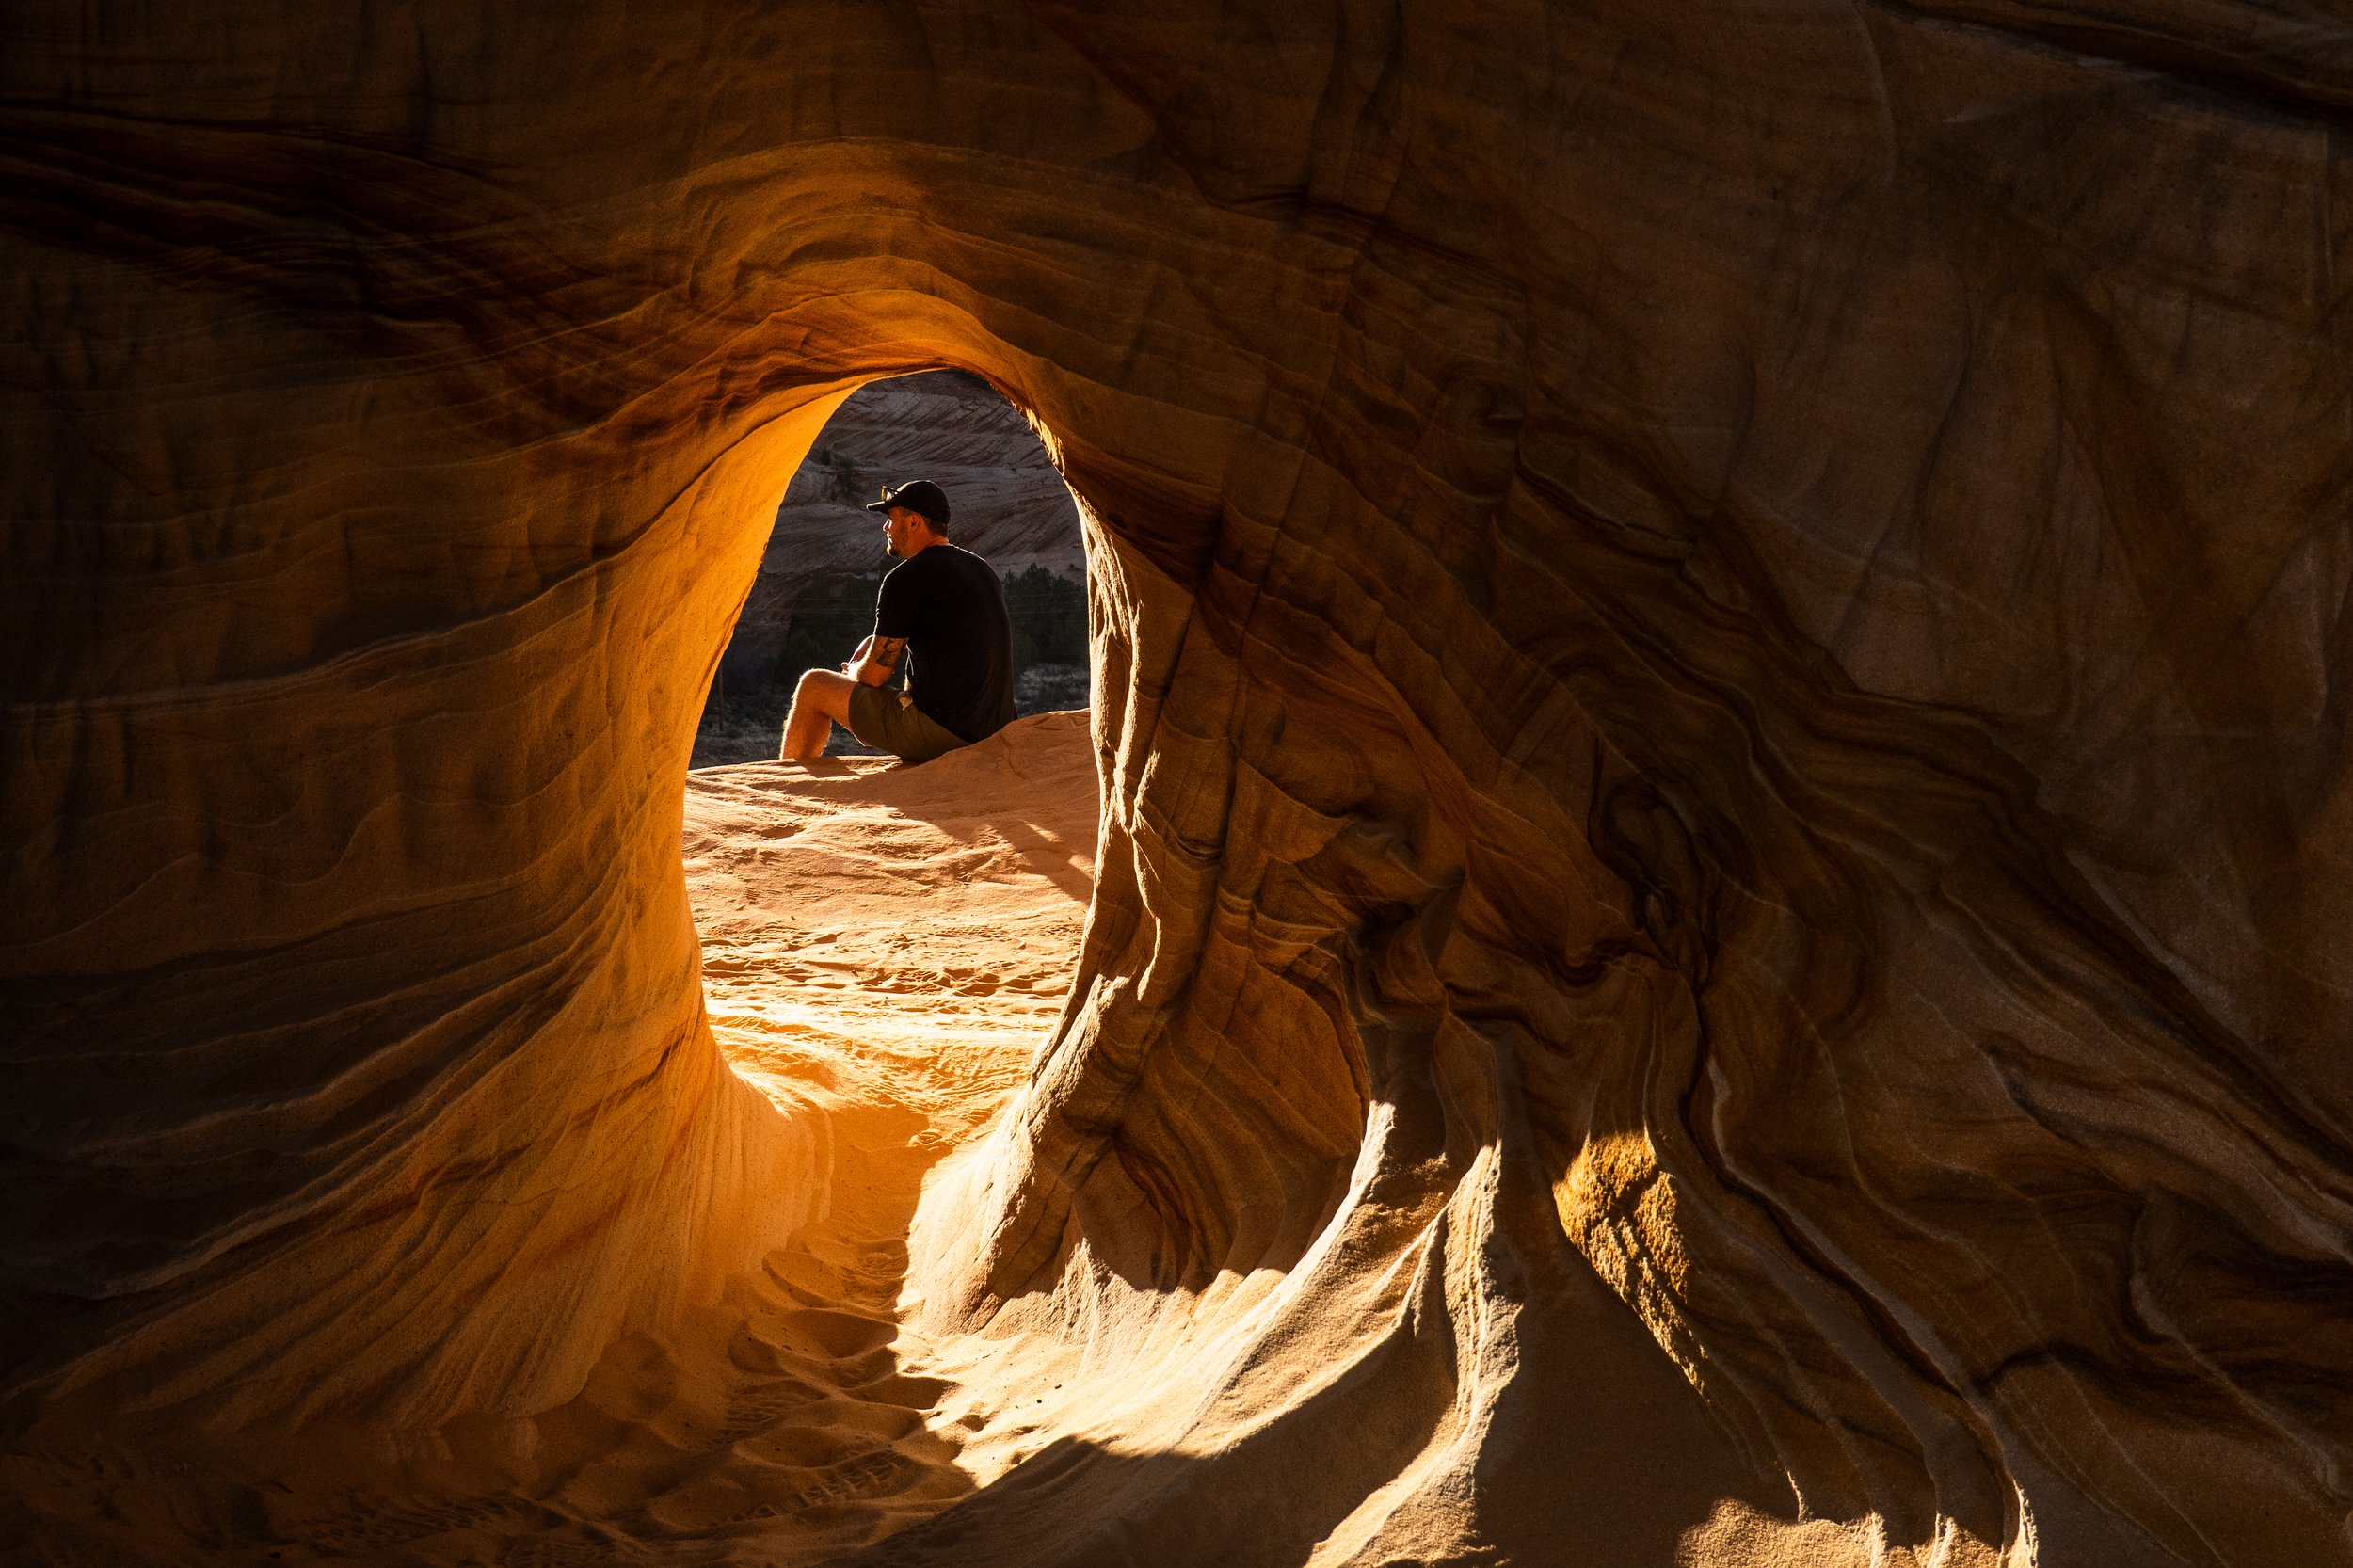

There is an entire micro system of tunnels built into this cave that are awesome to hang out in and explore.
We were lucky to have the whole place to ourselves for a short time at sunset.
This is a 10/10 stop if you’re passing through Kanab.
After a short hike back to the van, we finish out our drive into Page. We grab a late dinner and settle into a camping spot at Lone Rock Beach.
Day 5 - Last Day
Campsite: Lone Rock Beach Campground
Cost: $35 for Park Admission + Overnight Camping Fee
We kept the trend going last night by pulling into our campsite past dark, leaving us without much way of making out what our morning view would look like.
This is what we woke up to.


We should really be out buying lottery tickets instead of hanging out at this beach all morning because our luck with camping spots this trip has been unreal.
This place was busier than most of the sites we’d stayed at but it didn’t bother us at all. There were lots of families hanging out by the water, swimming, laying out, etc. This would be a great spot to call camp for a family vacation.
We originally planned on just sleeping here and doing some hiking around Page, but the beach felt like such a relaxing way to wrap up our trip. We stayed here for the better part of the day, embracing the great weather and views.
If I’m ever in Page again, I would absolutely stay here longer.
The vibes were awesome, scenery is gorgeous and who doesn’t want the option to swim at their campsite?!
Whitney’s built-in shower came in clutch here to wash all the sand off of our shoes and chairs so that we didn’t drag all of it into the van.
Around 2pm, it’s time to get back on the road and get Whitney back to Tempe.
Lauren and I had both been to Page before, so our plans to hike and sightsee there fell second to our beach day.
But that doesn’t mean it has to for you.
There’s plenty to do and see in Page and I highly recommend you taking advantage if you have the time.
Here’s a few recommendations from past trips to Page:

Horseshoe Bend
Hike Distance: ~1.5 miles round trip
Difficulty: Easy
Time Required: 30–60 minutes
Big Lake Sand Cave
AKA “The Sand Cave behind the Shell gas station”.
Distance: Approximately 0.5 to 1 mile round trip
Difficulty: Easy
Duration: 15–30 minutes
Address: 1501 Coppermine Road, Page, AZ 86040
Trailhead: Behind the Shell gas station is a dirt lot. Follow the footpath through soft sand toward the sandstone mesa. The trail is unmarked but well-trodden.
I would recommend both of these to anyone visiting Page for the first time. They’re both easy hikes that people of all ages can enjoy.
And That’s A Wrap
We packed ALOT into these 5 days with Whitney.
If you’re looking to plan a trip similar to this one, I definitely recommend going through BOHO Vans. This is our second time traveling with them and van travel it’s very quickly becoming one of our favorite ways to get out and explore new areas.
If you want to read about our first van trip to Monument Valley, you can check that out here.
Hopefully you’re able to take some inspiration from our trip and apply it to your own itinerary!